INSTRUCTION MANUAL
for
Graflex
CAMERAS
RB Super D * RB Series B
ALSO EARLER MODELS INCLUDING
Series B * RB Series D Auto * RB Auto
* Auto Jr. RB Tele * RB Jr.
PRINCIPLES OF THE GRAFLEX --
All Models
Graflex Photography is built around
three simple elements:
1. A reflex viewing-focusing optical system that shows on a ground-glass
an exact, erect image of the scene to be photographed, without parallax
and with the same depth of field as the image on the negative;
2. a multiple-speed focal-plane shutter giving a wide range
of exposures up to 1/1000 with efficiency and reliability; and a
3. wide selection of sensitized materials through availability of
various types of holders, and a quick, simple, positive means of attaching
them to the camera.
![[Figure 1]](Fig1.jpg) The
first two elements are interlocked to make operation rapid and simple;
the third gives an unlimited choice of emulsions to suit all conditions
and types of work.
The
first two elements are interlocked to make operation rapid and simple;
the third gives an unlimited choice of emulsions to suit all conditions
and types of work.
1. Reflex focusing is illustrated in Figure 1. Light enters the
camera through the lens 5 and is reflected upward by the mirror
3 to the ground-glass screen 2; visibility of the image is improved
by the light-excluding focusing-hood 1. The lens is focused by focusing
control 4. Since the focusing screen and the film are
equidistant from the lens, sharpness of the image
on the ground glass indicates the sharpness of the negative. The mirror
automatically lifts away just before exposure, so that light from the lens
passes directly to the film to form the image.
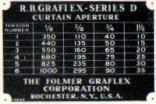
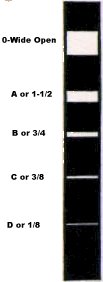 2. The focal-plane
shutter is a curtain (Figure 2) of special cloth containing five slits
of different widths. It is carried on an upper roller and winds
down across the film and onto a lower roller when released by movement
of the mirror. (Its action may be observed with the film holder removed
from the back of the camera.) The time of exposure is governed by two variables:
2. The focal-plane
shutter is a curtain (Figure 2) of special cloth containing five slits
of different widths. It is carried on an upper roller and winds
down across the film and onto a lower roller when released by movement
of the mirror. (Its action may be observed with the film holder removed
from the back of the camera.) The time of exposure is governed by two variables:
a. the width of the slit (or curtain aperture), and
b. the speed of the curtain (controlled by tension of the
lower roller) .
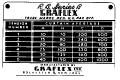
The shutter-speed plate (Figure 6, 6a, 6b) shows
the various exposures resulting from different combinations of slit and
tension.
Directions for the shutter controls will be found on pages 9,10,11,12
and 13.
3. Sensitized materials to receive the image are carried in a suitable
holder (Figure 8) behind the curtain. Several types of accessories are
available for this purpose: sheet film holders. plate holders, film pack
adapters and sheet film magazines for all sizes of the Graflex;
and for certain sizes only there are plate magazines and roll
holders. Instructions for using the last three types of accessories
are supplied with them.
A fine camera is primarily an instrument rather than a machine, and
the reputation which Graflex products have won for sturdiness and continued
functioning under adverse conditions should in no sense be an invitation
to abuse them. To insure the long and trouble-free life of which your camera
is capable, study and follow these directions as you handle it for the
first time. Above all, do not twist any knobs or push any buttons on this
camera until you know what this pamphlet tells about them. Do not lend
your camera to anyone not familiar with it without instructing him in how
to use it. If you lose this book, write us for another.
Since the manner of operating all Graflex cameras is the same in all
important details, this manual applies equally well to all current and
most older models. Minor points of variation between the different models
will be clearly emphasized and explained. These differences relate principally
to 1. opening and closing the camera, 2. interchanging lenses,
and 3. focusing controls.
The National Graflex, RB Series C, and the 5 x 7 RB Home Portrait Graflex
and some of the earlier folding cameras, are covered by their own special
manuals.
OPENING THE CAMERA AND FOCUSING
Series B * R.B. Series B * R.B. Series D * R.B. Super
D *
R.B. Tele * R.B. Auto (Stationary Back) * Auto Jr. * R.B. Jr.
The top is first opened (Figure 3) by releasing the spring catch
L at the upper front of the camera, pulling the top up and hack until
the focusing hood is fully extended and straightening the two side
braces until they lock in position.
Then open the front of the camera by turning the knurled focusing control
S forward (clockwise); this moves the lens carrier and lens forward and
automatically releases the front door so that it snaps up. 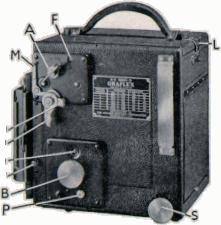 The
opened door of the R.B. Super D and Series D serves well as a lens-shade
by virtue of the side flaps.
The
opened door of the R.B. Super D and Series D serves well as a lens-shade
by virtue of the side flaps.
R.B. Auto Graflex
Open the top as directed above. This model has an extra-long bed, which
accommodates the additional bellows extension and also serves as the front
door. Release it by pressing on the bed-release button under the
leather at the top of the extreme front of the camera, and press the bed
firmly down until the bed braces snap into position (Figure 10).
There are two focusing controls for the R.B. Auto Graflex (Figure
10, Page 24): one at the lower right front corner of the body, is used
for normal work; the other, on the right side of the bed near the front,
comes into use when the bellows are given considerable extension--as when
focusing at very close range.
Further data on close-up work with the R.B. Auto Graflex will be found
on pages 24 and 25, and other specific information on page 9.
CLOSING THE CAMERA
Rack the lens all the way back into the camera and close the front door
or bed, making sure that it snaps securely.
To close the top, fold the braces and push the top down, folding the
focusing hood carefully back into its original position. Make sure the
top is securely held by the snap-catch at the front.
Important: After closing the camera remove all tension
from the shutter mechanism by releasing both the aperture and the tension
controls to their lowest settings, and raise the mirror by pressing release
lever. (See bottom of page 9).
Note: Some large lenses when racked back may not permit the mirror to
rise fully. In such an in stance, release the mirror before racking the
lens into the camera. This will prevent the mirror from accidentally striking
the lens mount.
HOLDING THE GRAFLEX
All Models
| The shape of the Graflex and the position of its controls permit it
to be held and operated comfortably and without strain. The fact that an
erect image is visible in the ground glass, right up to the instant of
exposure, further simplifies the handling of the camera.
Rest the camera in both bands, with the fingers under the corresponding
front corners of the body (Figure 4). The thumb of the left hand falls
naturally on the release lever, while the right thumb and the forefinger
are in position to grasp the focusing knob S. To steady the camera,
hold it firmly against the chest. To reset the controls after exposure,
tilt the camera to the left so it rests on the left hand and forearm.
|
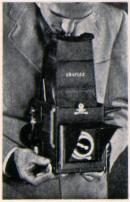
Figure 4 |
FOCUSING--General
(See below for Super D with automatic diaphragm).
The Mirror must be set for focusing; see page 11. Information on the
ground glass is on Page 14.
Moving the lens away from the film focuses on close subjects; moving
It toward the film focuses on more distant subjects.
Focusing will be greatly facilitated by a large diaphragm opening. This
gives a bright image, and in addition the shallow depth of field will make
critical focusing an a specific point or plane much easier and more precise.
Don't forget to set the diaphragm before exposing!
Focusing with Automatic Diaphragm--Super D
![[Figure 5]](Fig5.jpg) |
|
Figure 5
|
The automatic diaphragm, as used in the Super D Graflex, permits you
to focus with the lens wide open and then automatically stops itself down
to a pre-selected aperture while the mirror is rising before exposure.
This facilitates focusing with a filter in place, with poor light, with
a very bright light that blinds the eyes, and whenever a critical focus
is desirable. Since the depth of field (see page 19) is shallower wIth
the lens wide-open than when it is stopped down, the plane of sharp focus
is more clearly defined and accurate focusing is more rapid and certain.
To set the automatic diaphragm, pull out the stop-pin (left in Figure
5) and move it until its pointer ispposite the aperture required by light
conditions and shutter speed; release the pin 50 that it engages the corresponding
hole and remains in position. Then set the mirror, slit and tension as
directed on page 10. Lastly, move the aperture lever to the right (counter-clockwise)
until it engages and is retained by the catch. (Figure 5 shows this position.)
When the mirror-release is depressed, a connecting mechanism within
the camera lifts the catch so that the spring mechanism in the lens mount
closes down the diaphragm, even to the smallest stop, before the curtain
begins to open.
Note that for very critical exposure control, half-stop settings are
available between f/5.6 and f/16. If it should be desirable to stop down
the diaphragm before exposure, slowly depress the mirror release part.way
until the diaphragm is heard to close; further pressure will release the
mirror and curtain. Naturally you need not set the diaphragm full-open
belore exposure if you prefer not to for certain special conditions.
INTERCHANGING LENSES
Series B. * R.B. Series B . * Auto Jr. . * R.B. Jr.
The lenses of these Graflex cameras thread directly into fixed lens
boards, and are removed by simply turning the entire lens barrel counter
clockwise. Be sure to grasp the barrel itself, near the lensboard, so that
you will not accidentally loosen the front cell of the lens. If the lens
does not free easily, slightly loosen the four small screws in the face
of the lensboard.
Certain telephoto lenses are suitable for use with these cameras. They
may require an adapter or intermediate collar threading into the open mg
in the lensboard. Focusing and exposing with these lenses is carried out
in the normal way.
R.B. Super D . * R.B. Series D . * R.B. Tele Auto (Stationary
Back)
Lenses of these models are fitted to removable lensboards. They are
removed by pushing lens and lensboard straight up, against a hidden spring,
until the bottom of the lensboard is clear of the lower retaining strip;
it may then be swung out and down, free of the camera. If the lens has
a very krge diameter it may be necessary to unscrew it from the lens board
before the lenshoard can be removed from the camera.
To replace the lens and lenshoard, reverse the above procedure- with
the bevelled edge of the lensboard at the top, so that it fits into the
slot with the hidden spring. Be sure to pull the lensboard all of the way
down behind the lower retaining strip.
Lenses in barrel mount and in automatic diaphragm mount are fully interchangeable
in the Super D Graflex, without special adjustments. The automatic diaphragm
should be set before it is fitted into the camera.
R.B. Auto Graflex
Lenses of the R.B. Auto Graflex are fitted to removable lensboards.
held in place by a slide-lock and retaining strip similar to those used
on the back of the camera to retain the film and plate holders. To remove
lens and lensboard, move the slidelock to the left and up untfl the top
of the lensboard is free; swing the top of the lenshoard out and lift the
bottom out from behind the lower retaining strip.
To replace a lensboard, reverse the above procedure--making sure that
the bevelled edge of the lensbeard is at the bottom.
THE FOCAL-PLANE SHUTTER--All Models
This type of shutter is so-called because it operates close to the focal
plane of the lens (the location of the film). Its principal advantages
are:
- ready interchangeability of lenses,
- high efficiency,
- ability to produce extremely short exposures, and
- long, trouble-free life.
The controls of the shutter and mirror, shown in Figure 3, are located
at the right rear of the camera. The release lever, which is depressed
to make an instantaneous exposure, is actually the mirror release and is
located at the front of the left side convenienfly under the left thumb.
On many models each of the shutter and mirror controls has an identifying
letter stamped into it. These letters are the same on all models of the
Graflex (except the National Graflex which has its own manual) although
the form of a particular lever or key may differ some what from one camera
to another. The letters used below refer to Figure 3.
The various combinations of the tensions and four apertures provide
a wide range of speeds (shutter settings), up to 1/1000. Fig. 6, 6A).
Before actually using the camera, set it on a table and follow the description
below by manipulating each control as it is mentioned.
Setting the Curtain Aperture (slit)
The mirror-setting lever H, just under the aperture control A, (Figure
3) is extremely important because the curtain cannot move (except when
set for Time) until the mirror has been set by pressing this lever down
and back (toward the rear of the camera). The curtain aperture (slit) to
be used for an exposure is set by the aperture control A; and the tension
(which determines the speed with which the curtain moves) is set by tension
control B. Windows r and G, next to their respective controls, show the
settings of these adjustments. Turning A counter-clockwise (clockwise in
the Auto Jr.) with the arrow, winds to narrower slits; moving curtain-release
lever M toward the back of the camera allows the curtain to unwind to wider
slits.
The figures on the scale showing in F indicate the aperture that will
next pass across the film when the curtain is released. When set on T (for
Time Exposure), releasing the shutter places the slit 0 in front of the
film exposing the enitre film at the same time. Operating the curtain-release
M a second time closes the curtain.
 |
 |
 |
|
Figure 6
Shutter Speed Plate
Recent Models
|
Figure 6a
|
Figure 6b
|
In the 2-1/4x3-1/4 R.B. Series B, it is necessary to wind A two clicks
between settings; the number exactly centered in F indicates the aperture
for which it is set. The curtain is closed when any number except 0 (Open)
is centered in F.
the correct aperture and tension on the shutter speed plate (Fig. 6).
Locate 1/125 on the plate; reading straight up, you will find aperture
B, reading straight to the left you will find tension No.5 or L.
- Set the tension by rotating B or releasing it by repeatedly lifting
up on button P, until the desired number or letter (5 or L in our example)
appears in window G.
- 4. Set the curtain aperture by rotating A or releasing it with M until
the desired number (B in our example) appears in window F. The aperture
control A will not turn unless the mirror is down in focusing position.
- 5. Remove the slide from the film holder.
- 6. Compose and focus on the ground glass.
- 7. See that the diaphragm is set correctly.
- 8. Press slowly and steadily on release lever with the left thumb.
This permits the mirror to rise clear of the field of the lens, its motion
rotating lever M until it releases the curtain. The slit in the curtain
then passes across the film and the exposure is made.
- 9. Re-set the mirror by pressing back on H.
- 10. Turn key A until B again appears in window F. Change the film.
(Replace the slide if the film carrier is to be removed from the camera.)
Open the automatic diaphragm of the Super D GRAFLEX Model to facilitate
critical focusing. You are now ready to make another picture with the same
exposure.
Note: A "drop-curtain" exposure of about 1/5 second is obtained
with the curtain at 0 and the tension at 6 or H.
Making a Time Exposure
The procedure for a Time exposure is somewhat different, because the
mirror and curtain are released separately.
- Set the mirror by pressing on H.
- Move the I-T bar* all the way to the right until the I is covered and
the T is visible; this disconnects the mirror from the shutter. (*If your
camera has a disc instead of a bar, see footnote on page 11)
- Set the aperture at T.
- Set the tension at 3 or higher, (H on Super D) .
- Make sure the camera is firmly supported, as on a Crown Tripod or a
steady table. Compose and focus on the ground glass.
- See that the diaphragm is set correctly.
- Raise the mirror by pressure on release lever.
- Open the curtain by a steady, gentle pressure on the curtain-release
M.
- At the end of the required exposure time, close the curtain by another
steady, gentle pressure on M.
- If you are going to make another Time exposure of the same subject
with the same composition and focus, leave the mirror up and insert the
slide in the holder before re winding the curtain to T. Or you can re-set
the mirror, wind the shutter, change the film, check the focus and release
the mirror.
- If you are not going to make another Time exposure im mediately, replace
the slide, set the mirror by pressure on H, and re-set the I-T bar so that
the I is showing and the camera is ready for an instantaneous exposure.
Continue to other sections of this manual:
Brought to you by Graflex.Org